
Holidays
A holiday is a non-working day. It is painted with a special background color on the schedule.
All holiday functions are accessible from the Holidays view.
Create a Holiday
To create a holiday, click the button on the toolbar of the Holidays view.
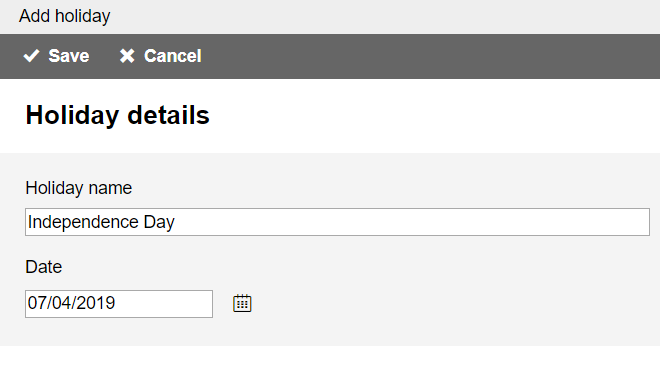
When you're finished configuring the holiday, click the button at the top of the page to create the new holiday, or click the button to discard it.
Enter a holiday name and set the date of the holiday.
Select Holidays
If you want to copy or delete multiple holidays at once, you have to select them first.

To select a holiday navigate to the Holidays view and click on the checkbox to the left of the holiday row. This will highlight the full row. Then click the other rows you want to select too.
To select all rows on the page, click on the checkbox on the header row.
To unselect a row click it again.
To clear the selection click the button on the toolbar.
Copy Holidays to Next Year
If a holiday takes place on the same date in the next year, you can copy it from the previous year.
Click the button on the row of the holiday you want to copy or right-click on the holiday name to open the context menu. Then select from the menu.
To copy multiple holidays select the holidays you want to copy, then click the button on the toolbar.
Edit a Holiday
To edit a holiday, navigate to the Holidays view and click the name of the holiday to open the holiday page.
Delete Holidays
To delete a single holiday either click the button on the holiday row or right-click the holiday name to open the context menu. Then select from the menu.
To delete multiple holidays select the holidays you want to delete, then click the button on the toolbar.
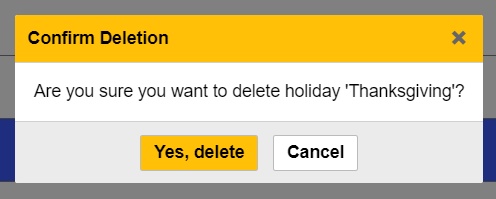
In all cases a window appears in which you must confirm the deletion.